Landscaping With Boulders: Stunning Ideas for Your Yard
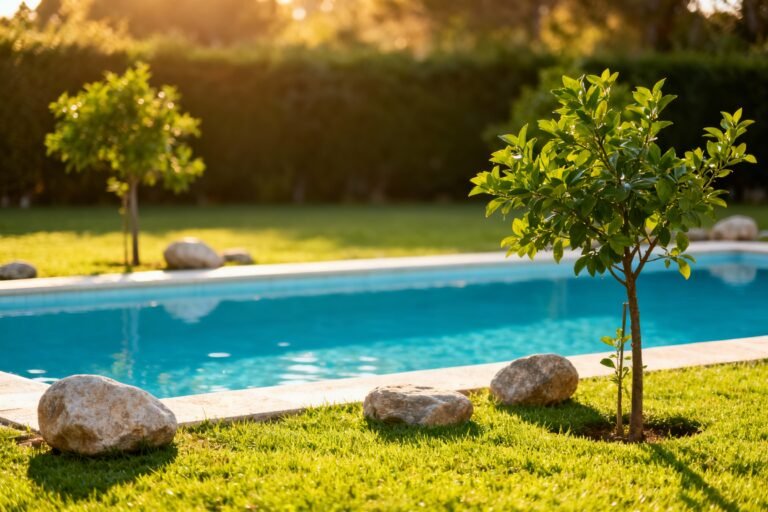
Big plants are cool, but have you tried adding a giant rock to your yard? Boulders bring instant character, texture, and that “I planned this” vibe—even if you didn’t. They ground a space (literally and visually), and they don’t die if you forget to water them.
Ready to stop decorating with pebbles and start making statements?
Why Boulders Work (And Don’t Just Sit There)
Boulders do more than look pretty. They anchor your landscape and create structure, which makes everything else—plants, paths, lighting—feel intentional. They also offer contrast: rough vs. smooth, heavy vs. airy, wild vs. manicured.
You also get long-term value. Rocks don’t fade like mulch or crack like plastic edging. Place them right and they’ll outlast your patio, your fence, and maybe your HOA drama. Pro tip: Think of boulders as the furniture of your garden.
You place them once, then design everything else around them.
Choosing the Right Rock (Color, Shape, and Vibes)
Not all boulders belong in every yard. Pick ones that match your home’s style and the local geology so they look native, not shipped in from Mars.
- Color: Match or complement your house. Warm tan sandstone plays well with stucco and desert palettes.
Cool gray granite fits modern and coastal vibes.
- Texture: Rough stone feels natural and hides dirt. Polished stone screams “fancy” but can look out of place in rustic settings.
- Shape: Rounded boulders give a soft, riverbed look. Angular ones add drama and modern structure.
IMO, mix two shapes max.
- Size: Go bigger than you think. A “big” rock in a store looks tiny in your yard. As a rule, choose at least one piece that’s 2–3 feet across.
Local Stone vs.
Imported
Buying local stone usually costs less, blends better, and keeps your yard from looking like a theme park. Exceptions: you want a specific color/texture or you’re building a very curated modern space. FYI, your region’s stone yard is a goldmine of options—bring photos of your site.
Placement: Where the Magic Happens
You can toss gravel anywhere, but boulders need strategy.
Start with focal points and work outward.
- Anchor corners and curves: Place a boulder at the start of a path, the edge of a patio, or the bend in a bed to guide the eye.
- Use odd numbers: Group in threes or fives for a natural look. One hero stone + two supporting actors? Chef’s kiss.
- Bury 25–40%: Sink the base so it looks like it’s always lived there.
If it looks perched, you’ll feel it.
- Consider sightlines: Stand at your front door, street, and favorite chair. Can you see the composition from those spots?
- Don’t block doors or views: Sounds obvious until you plunk down a 600-pound view killer.
Creating Flow
Repeat color and shape to lead the eye across your landscape. For example, echo the gray veins in your hero boulder with smaller rock mulch, then tie it all together with a flagstone step.
That’s cohesion without trying too hard.
Design Ideas You’ll Actually Use
You don’t need a full rock garden. Add one or two ideas and you’re off.
- Feature cluster: Three boulders with staggered heights, a few grasses, and a low spotlight. Instant focal point.
- Seating stone: A flat-topped boulder near a fire pit or shade tree.
Comfortable height is 16–18 inches. Bonus: zero maintenance.
- Dry creek bed: Use boulders as banks and cobble as the “flow.” It directs drainage and looks great even when dry.
- Entry statement: Flank your walkway with a pair of matching stones and low evergreens. Clean and classic.
- Rock + water: Turn a boulder into a bubbling fountain with a drilled core.
Calm vibes, low splash, high impact.
- Terrace helper: Use larger boulders as natural retaining elements on a slope. Plant between cracks for a soft finish.
Plant Pairings That Never Miss
– With warm sandstone: lavender, autumn sage, blue fescue, agave – With cool granite: Japanese forest grass, hosta, creeping thyme, dwarf conifers – With basalt or dark stone: silver artemisia, sedum, white-flowering yarrow Rule of thumb: Soft, mounding plants + spiky verticals = perfect contrast against stone.
Installation 101 (Without Wrecking Your Back)
Yes, these things are heavy. Respect the physics and plan ahead.
- Mark your spots: Lay out with paint or a hose.
Step back and adjust before anything heavy arrives.
- Prep the base: Dig a shallow bed and compact a few inches of decomposed granite or road base. Stable base = no rocking.
- Set the stone: Use machinery for anything you can’t lift safely. A skid steer or crane truck beats a chiropractor bill.
- Rotate for face: Every boulder has a “front.” Turn it until the best planes face your key views.
- Backfill and tamp: Pack soil or base around the buried portion.
Water lightly to settle, then top off.
Safety and Logistics
– Call before you dig. Utilities are not a fun surprise. – Use straps, not chains, on natural stone. – Protect hardscape with plywood if you’re driving equipment over it. – Wear boots and gloves. Your toes will thank you.
Budgeting and Sourcing
Boulders price by weight or by the piece.
Costs vary wildly by region and rock type, but here’s a ballpark.
- Stone cost: $120–$400 per ton for common local stone; specialty stone can hit $600+ per ton.
- Delivery: Usually $100–$300, depending on distance and truck size.
- Placement: Crane or boom truck time runs hourly. Factor in at least one hour on site for careful placement.
Money saver: Buy fewer, larger stones instead of many small ones. One statement boulder looks custom; fifteen baseballs look like you spilled the gravel.
Where to Buy
– Local rock yards or landscape supply centers – Quarry direct (if you need a lot) – Contractors with leftover inventory (ask nicely) – Online marketplaces—just verify weight, species, and delivery method
Maintenance (Spoiler: Almost None)
Rocks don’t need pruning, but they appreciate a little housekeeping.
- Weeds: Install landscape fabric under dry creek beds only; elsewhere, mulch and hand-pull as needed.
- Cleaning: Rinse dust off new installs.
Skip harsh chemicals. A stiff brush handles algae or mud.
- Settling: If a stone tilts after storms, add base material and re-tamp. This happens, especially on slopes.
- Plants: Trim plants to reveal stone faces.
The rock is the star—don’t hide it behind a shrub mullet.
Common Mistakes to Avoid
– Going too small: Pebble-sized “boulders” disappear. Scale up, especially in large yards. – Floating stones: Not burying the base makes them look fake. Sink them generously. – Random scatter: Sprinkle rocks everywhere and you get chaos.
Group with intent. – Mismatched geology: Mixing ten rock types feels messy. Stick to one family, two max. – Ignoring context: Match your architecture. Cottage charm wants softer, rounded stone.
Modern lines love angular faces.
FAQ
How many boulders do I need for a typical front yard?
For a standard suburban front yard, start with one hero boulder and a supporting pair. That gives you impact without clutter. Add more only if your beds are large and you have a clear plan.
Can I install boulders myself?
You can set small to medium stones with a couple of strong friends and the right tools.
Anything above a few hundred pounds? Hire a pro with equipment. It’s faster, safer, and usually cheaper than DIY oopsies.
What plants survive best around boulders?
Go for tough, drought-tolerant plants that like good drainage: sedums, ornamental grasses, thyme, salvia, yucca, and dwarf conifers.
They tuck into crevices and handle reflected heat from stone.
Do boulders attract pests?
Not really. They can create cool crevices where lizards (yay) and occasional insects (meh) hang out, but they don’t attract termites like wood. If you stack stones, avoid perfect hiding spots near your home’s foundation.
Will boulders affect drainage?
Yes—in a good way if you plan it.
Use them to slow runoff, deflect water, and reinforce swales. Always slope soil slightly away from structures and leave escape routes for heavy rain.
How do I keep boulders from looking too “decorative”?
Bury part of them, cluster thoughtfully, and repeat materials. Blend with native plants and irregular edges.
IMO, if it looks like a lawn ornament, you placed it too high or too symmetrically.
Wrap-Up: Go Big, Go Natural
Boulders add instant structure, texture, and wow-factor without extra maintenance. Choose a stone that fits your vibe, sink it like it belongs, and design plants and paths around it. Start with one statement piece, then riff from there.
Your yard will look grounded, intentional, and—dare I say—rock solid.