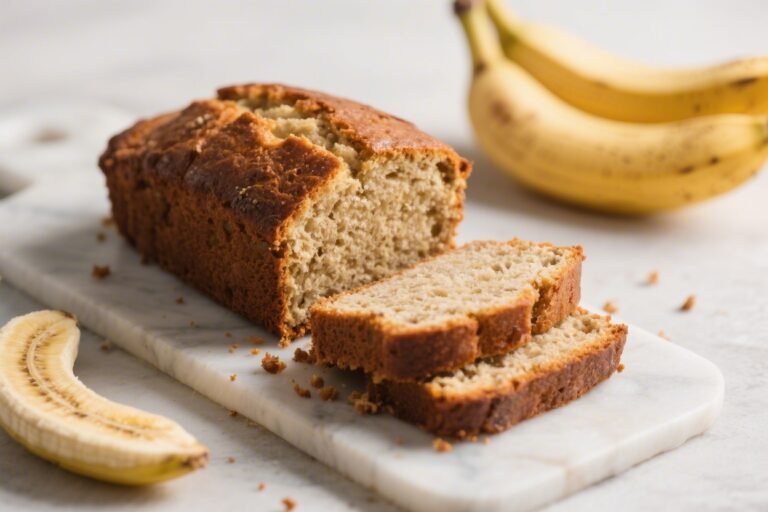
Banana Brownie Bars Recipe That Slaps: Fudgy, One-Bowl, and Zero Guilt (Well, Almost)
You’ve got spotty bananas on the counter and a sweet tooth screaming for attention. Perfect. This Banana Brownie Bars Recipe is the fast-track to dessert glory—rich like a brownie, moist like banana bread, and no mixer drama.
Think bakery-level results with pantry-level effort. You’ll whip it up in minutes, then pretend it took you all afternoon. Everyone wins, especially your taste buds.
What Makes This Special
These bars hit the sweet spot between fudgy and fluffy—thanks to ripe bananas doing the heavy lifting.
They’re not just cocoa and sugar; they’ve got depth, moisture, and real flavor. The batter comes together in one bowl, so less cleanup and more snacking. Plus, they slice clean, travel well, and don’t need frosting to impress.
Add-ins? Totally fair game.
Ingredients Breakdown
- 3 very ripe bananas (about 1 1/4 cups mashed): The natural sweetener and moisture engine.
- 1/2 cup unsalted butter, melted (or 1/2 cup neutral oil): Butter = richer flavor; oil = extra moist crumb.
- 3/4 cup brown sugar (light or dark): Adds caramel notes and chew.
- 1/4 cup granulated sugar: Balances the banana’s acidity and boosts structure.
- 2 large eggs, room temp: For binding and fudginess.
- 1 teaspoon vanilla extract: Always.
- 1 cup all-purpose flour: Just enough to hold the fudge factor.
- 1/2 cup unsweetened cocoa powder (Dutch-process if you have it): Deep chocolate flavor.
- 1/2 teaspoon baking powder + 1/4 teaspoon baking soda: Lift without cakiness.
- 1/2 teaspoon fine sea salt: Wakes up the chocolate.
- 3/4 cup chocolate chips (semi-sweet or dark): Puddles of joy.
- Optional add-ins: 1/2 cup chopped walnuts or pecans, 1/2 teaspoon espresso powder, flaky salt for finishing.
The Method – Instructions
- Prep the scene: Heat oven to 350°F (175°C). Line an 8×8-inch pan with parchment, leaving overhang for easy lifting.
Lightly grease the parchment.
- Mash the bananas: In a large bowl, mash the bananas until mostly smooth with a few small bits. No blender needed—lumps add texture.
- Add the wet squad: Stir in melted butter (or oil), brown sugar, granulated sugar, eggs, and vanilla until glossy and cohesive.
- Whisk the dry crew: In a separate bowl (or on top of the wet before mixing), whisk flour, cocoa, baking powder, baking soda, and salt to break up clumps.
- Combine with restraint: Fold dry into wet just until no dry streaks remain. Do not overmix—we’re baking bars, not building gluten armor.
- Chocolate rain: Fold in chocolate chips (and nuts if using). Save a handful to sprinkle on top for that bakery look.
- Pan and smooth: Spread batter evenly in the lined pan.
Tap once to settle air pockets. Sprinkle remaining chips and a pinch of flaky salt, if you’re feeling fancy.
- Bake to fudgy: 24–28 minutes, until the edges are set and a toothpick comes out with moist crumbs, not wet batter. Slight underbake for maximum fudge.
- Cool with patience: Let cool in pan 20–30 minutes, then lift out with parchment to a rack. Cool fully before slicing into 12–16 bars.
Yes, waiting matters.
- Finish strong: Optional drizzle of melted chocolate or a dusting of cocoa. Serve slightly warm or room temp. Cue applause.
Keeping It Fresh
– Room temp: Store in an airtight container for 2–3 days.
Slip in a small slice of bread to keep bars soft (old bakery trick). – Fridge: Up to 5 days for extra fudginess. Bring to room temp or microwave 10 seconds for gooey chips. – Freezer: Wrap bars individually and freeze up to 2 months. Thaw at room temp 30 minutes or microwave 15–20 seconds. – Pro move: Freeze in a single layer first, then bag—no sticking, no crumbs lost to freezer drama.
Benefits of This Recipe
- Waste saver: Overripe bananas become dessert, not compost.
- One-bowl wonder: Minimal dishes, maximal payoff.
- Better-for-you sweetness: Bananas replace some sugar and fat while boosting moisture.
- Kid and crowd friendly: Mild banana, big chocolate—no one complains.
- Flexible: Works with butter or oil, nuts or no nuts, dairy or dairy-free chips.
What Not to Do
- Don’t use underripe bananas: Green bananas = starch city and muted flavor.
- Don’t overmix: Tough bars happen when you beat the batter senseless.
- Don’t overbake: Dry edges and crumbly middles are a vibe-killer.
Pull when slightly underdone.
- Don’t skip the salt: It doesn’t make things salty; it makes chocolate taste more chocolatey. FYI.
- Don’t slice hot: Warm bars shatter and smear. Cool first.
Discipline is delicious.
Variations You Can Try
- Peanut Butter Swirl: Dollop 1/3 cup warmed peanut butter on top; swirl with a knife before baking.
- Mocha Boost: Add 1 teaspoon espresso powder to the dry ingredients for deeper chocolate vibes.
- Salted Caramel: Drizzle 1/4 cup thick caramel over batter and swirl; finish with flaky salt.
- Double Banana: Fold in 1/2 cup banana chips for crunch.
- Gluten-Free: Swap in a 1:1 GF flour blend and add 1 tablespoon milk or water if batter feels thick.
- Vegan Route: Use oil, dairy-free chips, and replace eggs with 2 flax eggs (2 tbsp ground flax + 5 tbsp water). Bake 2–4 minutes longer, watching doneness.
- Tropical Twist: Add 1/2 cup toasted coconut and 1/4 teaspoon cinnamon. Unexpected, but it slaps.
FAQ
Can I use frozen bananas?
Yes.
Thaw completely, drain excess liquid, and mash. They’re perfect for baking because freezing intensifies sweetness. Just don’t add the extra thaw water—it can make the bars gummy.
What pan size works best?
An 8×8-inch pan yields thicker, fudgier bars.
A 9×9-inch pan bakes slightly thinner and may finish 2–3 minutes sooner. For a 9×13-inch pan, double the recipe and bake 28–34 minutes.
How do I tell when they’re done?
Edges should look set and slightly pulled from the pan. A toothpick in the center should come out with moist crumbs, not raw batter.
If it’s squeaky clean, you probably overbaked, IMO.
Can I cut the sugar?
You can reduce total sugar by 1/4 cup without wrecking texture. Any more and you risk drier, less fudgy bars. Ripe bananas help carry sweetness, so use the spotty ones.
What’s the best cocoa to use?
Dutch-process cocoa delivers smoother, darker chocolate flavor.
Natural cocoa works fine too—just expect a slightly lighter color and tangier profile.
Do I need a mixer?
Nope. A bowl, a fork, and a spatula do the job beautifully. Overmixing is the enemy anyway, so going low-tech is actually an advantage.
Why add baking powder and soda?
A small combo gives lift without turning the bars cakey.
The banana’s natural acidity activates the soda, while the powder ensures reliable rise.
How do I get clean slices?
Cool fully, then use a sharp knife wiped clean between cuts. For ultra-neat edges, chill 30 minutes before slicing. Pastry-chef move unlocked.
Can I make them nut-free?
Absolutely.
Just skip the nuts and use nut-free chocolate chips. The bars are rich and satisfying on their own.
How do I reheat leftovers?
Microwave a bar for 8–12 seconds to re-melt the chips and revive the fudgy texture. Top with a scoop of vanilla ice cream if you’re feeling extra.
Which you should.
The Bottom Line
These Banana Brownie Bars are the dessert hack you’ll keep on repeat: one bowl, high flavor, and forgiving enough for weeknights. Ripe bananas transform standard brownies into something richer, moister, and low-key addictive. Keep the ingredients on standby, and the next time those bananas go spotty, you’ll turn “oops” into “oh wow.” Consider this your new signature bake.