Chocolate Cake Recipe That Breaks the Internet: One Bowl, Zero Stress, 100% Moist
You don’t need a bakery. You need 10 minutes, a bowl, and this absurdly good chocolate cake recipe. The kind of cake that makes people whisper, “Wait, did you actually make this?” while reaching for seconds.
It’s rich, plush, and unapologetically chocolatey—like a velvet curtain in cake form. No weird techniques, no culinary ego, just simple steps that work every single time. Make it once and you’ll start inventing birthdays.
What Makes This Special
This cake is built for flavor and foolproof texture.
Cocoa bloomed with hot coffee means deeper chocolate intensity without extra sugar. Oil (not butter) keeps it moist for days, even in the fridge—no dry crumb drama.
The batter comes together in one bowl with pantry staples. No mixer needed, unless you want to flex.
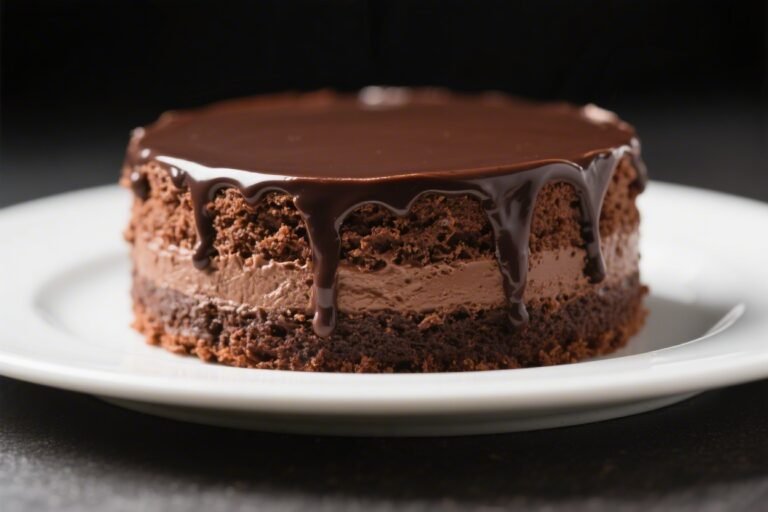
And the frosting? Glossy, silky, and totally spreadable—no grainy, sad buttercream vibes here. It’s the workhorse cake you’ll actually bake on a Tuesday.
Shopping List – Ingredients
- All-purpose flour – 2 cups (250 g)
- Granulated sugar – 1¾ cups (350 g)
- Natural unsweetened cocoa powder – ¾ cup (75 g)
- Baking powder – 1½ teaspoons
- Baking soda – 1½ teaspoons
- Kosher salt – 1 teaspoon
- Large eggs – 2
- Whole milk – 1 cup (240 ml)
- Neutral oil (canola, grapeseed, or light olive) – ½ cup (120 ml)
- Pure vanilla extract – 2 teaspoons
- Strong hot coffee – 1 cup (240 ml), freshly brewed
For the frosting (Silky Chocolate Fudge):
- Unsalted butter – 1 cup (225 g), room temperature
- Powdered sugar – 3 cups (360 g), sifted
- Cocoa powder – ¾ cup (75 g)
- Heavy cream – 5–7 tablespoons, as needed
- Vanilla extract – 1 teaspoon
- Fine salt – a pinch
- Dark chocolate – 3 oz (85 g), melted and cooled slightly (optional for extra gloss)
Cooking Instructions
- Prep the pans and oven. Heat oven to 350°F (175°C).
Grease and line two 8-inch round cake pans with parchment. Dust with cocoa powder, not flour, to keep edges dark and pretty.
- Mix the dry team. In a large bowl, whisk flour, sugar, cocoa, baking powder, baking soda, and salt until no cocoa clumps remain. This is your cake’s foundation—smooth equals even rise.
- Add the wet team (except coffee). Whisk in eggs, milk, oil, and vanilla until the batter looks thick and glossy.
No need to overthink it; 30–45 seconds is plenty.
- Bloom with hot coffee. Pour in the hot coffee and whisk slowly. Batter will go thin—good sign. The heat wakes up the cocoa for bigger flavor.
FYI: you won’t taste coffee, just deeper chocolate.
- Divide and bake. Pour into pans. Tap each pan twice to pop air bubbles. Bake 28–33 minutes until a toothpick comes out with a few moist crumbs.
Don’t overbake unless you enjoy regret.
- Cool like a pro. Let cakes cool in pans 10 minutes, then turn onto racks. Peel parchment and cool completely. Warm layers + frosting = sliding chaos.
- Make the frosting. Beat butter until pale and fluffy, 2–3 minutes.
Add powdered sugar, cocoa, salt, and vanilla. Beat on low, then medium, drizzling in heavy cream until spreadable. Mix in melted chocolate if using for extra shine.
- Assemble. Level domes if needed.
Place first layer on a stand, add a thick swoop of frosting, edge to edge. Top with second layer. Crumb-coat thinly, chill 15 minutes, then frost generously.
Swirls = encouraged.
- Finish strong. Add chocolate shavings, flaky salt, or a drizzle of warm ganache if you’re feeling extra. Slice with a hot knife for clean edges.
Storage Instructions
- Room temp: Keep covered at cool room temperature for up to 2 days. The oil keeps it soft; no need to panic-chill.
- Refrigerator: Store covered for 4–5 days.
Bring slices to room temperature before serving for best texture.
- Freezer: Wrap unfrosted layers tightly in plastic and foil; freeze up to 2 months. Thaw in the fridge overnight, then frost.
- Leftover frosting: Refrigerate 1 week or freeze 2 months. Rewhip with a splash of cream to revive.
What’s Great About This
- Consistent rise: Balanced leaveners mean even, sturdy layers that slice cleanly.
- Ridiculous moisture: Oil + milk + hot coffee deliver a tender crumb that stays soft, even on day three.
- Low effort, high payoff: One bowl, no mixer for the cake.
Your whisk gets a workout, not you.
- Plays well with others: Works as layers, cupcakes, or a sheet cake. Same batter, different swagger.
Pitfalls to Watch Out For
- Overbaking: A minute too long can dry the edges. Pull when crumbs cling slightly to the tester.
- Skipping parchment: Don’t test your luck.
Parchment means stress-free release and tidy layers.
- Cold ingredients: Cold eggs and milk can tighten the crumb. Room temp helps the batter emulsify smoothly.
- Frosting too thick: If it tears the cake, add a tablespoon of cream at a time. If it slumps, add a spoonful of powdered sugar.
- Hot layers + frosting: You’ll create a slip-n-slide.
Cool completely—patience beats chaos, IMO.
Variations You Can Try
- Midnight Espresso: Swap half the milk for sour cream and add 1 teaspoon espresso powder to the dry mix. Top with chocolate-covered espresso beans for dramatic flair.
- Salted Caramel Stack: Fill the middle with salted caramel and a sprinkle of flaky salt. Frost as usual.
Sweet-salty magic.
- Chocolate Orange: Add 1 tablespoon orange zest and swap vanilla for 1 teaspoon orange extract. Garnish with candied peel.
- Raspberry Truffle: Spread a thin layer of raspberry jam between cakes. Finish with dark chocolate curls.
- Gluten-Free Friendly: Use a 1:1 gluten-free baking blend with xanthan gum.
Add 2 extra tablespoons milk if batter seems thick.
- Vegan Switch: Replace eggs with 2 flax eggs, use almond milk, and opt for vegan butter in the frosting. Coffee stays the hero.
- Sheet-Pan Party: Bake in a 9×13-inch pan for 32–38 minutes. Easier to transport and slice for crowds.
FAQ
Can I skip the coffee?
Yes.
Replace it with hot water or hot milk. You’ll lose a bit of depth, but the cake still slaps. The heat is key for blooming the cocoa, not the caffeine.
Which cocoa powder works best?
Natural unsweetened cocoa is the default here.
If using Dutch-process, keep the baking powder and soda as written—the batter is balanced enough to handle either, but natural will taste a touch brighter.
How do I get ultra-flat layers?
Use cake strips or wrap damp paper towels around pans with foil. Bake on the middle rack and avoid opening the oven early. Level cooled cakes with a serrated knife if needed.
Can I make cupcakes instead?
Absolutely.
Fill liners two-thirds full and bake 16–20 minutes. This yields about 24 cupcakes. Start checking at 16 minutes because nobody likes overbaked minis.
Why use oil instead of butter?
Oil stays liquid when chilled, so the cake stays tender even cold.
Butter brings flavor, sure, but in a chocolate bomb like this, oil wins on texture by a mile.
My frosting looks grainy—help?
Sift the powdered sugar and cocoa before mixing. If it’s still grainy, add 1–2 tablespoons warm cream and beat longer. A short rest (10 minutes) also lets sugar hydrate.
Can I make it ahead?
Yes.
Bake layers a day ahead, wrap tightly, and store at room temp. Frost the day of serving. Flavors actually deepen after a short rest—like leftovers, but fancy.
What if I only have one 9-inch pan?
Bake in two rounds or use a 9-inch springform and slice the single tall layer in half after cooling.
Adjust bake time; larger pans need a few extra minutes.
The Bottom Line
This chocolate cake recipe delivers that bakery-level crumb without the drama or the price tag. It’s moist, rich, and flexible enough to fit birthdays, weeknights, and “just because” cravings. Keep the ingredients on standby and you’re basically two moves away from hero status.
Ready to be the person everyone asks for “that cake” from? Cool—this is the one.