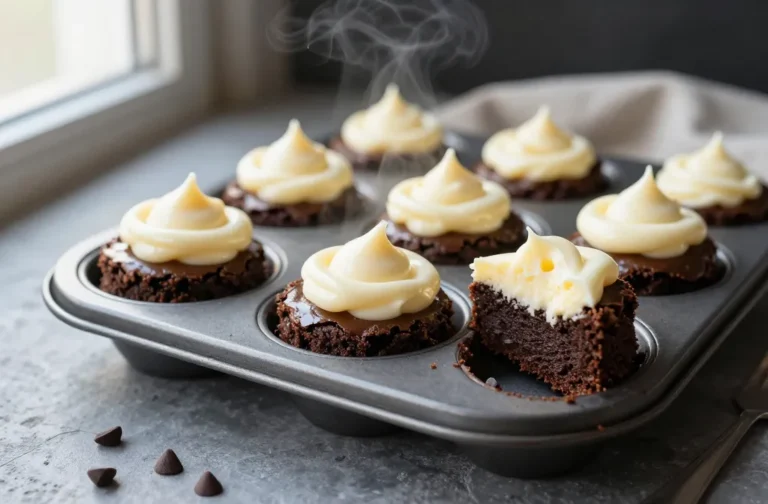
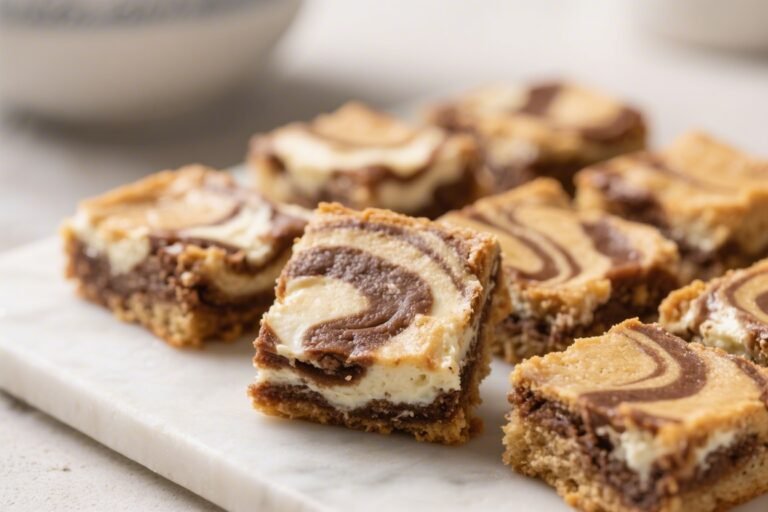
Red Velvet Swirl Brownies That Break the Internet: Fudgy, Bold, and Unapologetically Extra
Forget “just brownies.” These are the show-offs. You get the drama of red velvet, the decadence of a truffle, and the swagger of a bakery case—all in one pan. They’re the kind of dessert that makes people ask for the recipe before they even taste it.
And when they do? Silence. Chewy edges, creamy cheesecake swirls, and that unmistakable cocoa-vanilla vibe—this is your new flex, no permission needed.
The Secret Behind This Recipe
Classic red velvet isn’t just food coloring—it’s a careful balance of cocoa, vanilla, and acidity that creates a distinct flavor and tender bite.
Here, we double down with a dense, fudgy brownie base instead of cake, so every square eats like a luxurious chocolate bar with attitude. The cheesecake swirl is more than pretty: it adds tang and silkiness that keeps the brownie from feeling too heavy. Finally, a touch of espresso powder and brown sugar deepens the cocoa flavor, turning “sweet” into “sophisticated.”
What Goes Into This Recipe – Ingredients
- For the Red Velvet Brownie Base:
- 1/2 cup (113 g) unsalted butter, melted and slightly cooled
- 3/4 cup (150 g) granulated sugar
- 1/4 cup (50 g) light brown sugar, packed
- 2 large eggs, room temperature
- 1 tsp vanilla extract
- 1 tbsp red liquid food coloring (or gel, adjusted to intensity)
- 1 tbsp unsweetened natural cocoa powder
- 1/2 tsp espresso powder (optional but clutch)
- 1/4 tsp kosher salt
- 3/4 cup (95 g) all-purpose flour
- 1 tsp white vinegar (or apple cider vinegar)
- For the Cheesecake Swirl:
- 8 oz (226 g) cream cheese, softened
- 1/3 cup (65 g) granulated sugar
- 1 large egg yolk, room temperature
- 1/2 tsp vanilla extract
- Pinch of salt
- For the Pan:
- 8-inch (20 cm) square baking pan
- Parchment paper and nonstick spray
How to Make It – Instructions
- Prep the pan and oven. Heat oven to 350°F (175°C).
Line an 8-inch pan with parchment, leaving overhang for easy lifting. Lightly spray.
- Make the cheesecake swirl. Beat cream cheese, sugar, egg yolk, vanilla, and salt until smooth and glossy. Set aside.
Lumps are not invited.
- Whisk the wet ingredients. In a bowl, whisk melted butter, granulated sugar, and brown sugar until combined and slightly thick. Add eggs and vanilla; whisk until shiny and cohesive.
- Color and cocoa. Whisk in food coloring, cocoa powder, espresso powder, and salt. The batter should be a deep, bold red—adjust coloring as needed.
- Fold in flour. Add flour and gently fold just until no dry streaks remain.
Stir in the vinegar last; it brightens color and balances richness.
- Reserve some batter. Spread about 3/4 of the red batter into the pan. Dollop half the cheesecake mixture on top. Add remaining red batter in spoonfuls, then dot with the rest of the cheesecake.
- Swirl like you mean it. Use a butter knife or skewer to drag figure-eights through the batter, creating bold swirls.
Don’t overmix or you’ll lose the contrast.
- Bake. Bake 25–32 minutes. The edges should be set, the center slightly wobbly but not liquid. A toothpick should come out with a few moist crumbs (not wet batter).
- Cool completely. Let cool in pan on a rack for at least 1 hour, then chill 30–60 minutes for clean slices.
Yes, waiting is hard. Worth it.
- Slice and serve. Lift out with parchment and cut into squares with a hot, wiped knife. Admire your work like a proud pastry architect.
Keeping It Fresh
Store brownies in an airtight container in the fridge for up to 5 days because of the cheesecake layer.
For best texture, let them sit at room temp 15–20 minutes before serving—chewy edges, creamy centers, zero regret. You can also freeze slices individually, well wrapped, for up to 2 months. Thaw in the fridge overnight, then bring to room temp for peak fudginess.
Benefits of This Recipe
- Two desserts in one: You get fudgy brownie meets tangy cheesecake—ultra-satisfying without needing frosting.
- Eye-catching presentation: Those red and cream swirls look bakery-level with minimal effort.
Instant party cred.
- Balanced flavor: Cocoa, vanilla, and a touch of acidity deliver depth, not just sweetness.
- Make-ahead friendly: Chills beautifully, slices cleanly, and travels well. Potlucks will never be the same.
- Customizable: Swap toppings, play with shades of red, or add white chocolate chips if that’s your vibe.
Pitfalls to Watch Out For
- Overbaking: This is the fastest way to dry, cakey brownies. Pull them when the center is just set and a bit soft.
- Cold cream cheese: It won’t blend smoothly and will leave lumps.
Room temp only, please.
- Over-swirl syndrome: Too much swirling turns the batter pink and muddy. Three to four figure-eights are plenty.
- Wrong pan size: A 9-inch pan will bake thinner and faster; watch the time like a hawk. An 8-inch is the sweet spot.
- Skipping the vinegar: It subtly sharpens flavor and color.
Tiny detail, big payoff.
Different Ways to Make This
- White chocolate upgrade: Fold 1/2 cup white chocolate chips into the red batter for pops of creamy sweetness.
- Raspberry ripple: Swirl in 2–3 tablespoons seedless raspberry jam with the cheesecake layer for tart contrast.
- Gluten-free swap: Use a 1:1 gluten-free flour blend with xanthan gum. Bake time may vary by 2–3 minutes.
- Valentine minis: Bake in a parchment-lined 9×13, reduce time to 18–22 minutes, and punch out heart shapes (snacks from the scraps = chef’s privilege).
- Mocha moment: Increase espresso powder to 1 teaspoon and add a teaspoon of instant coffee to the cheesecake mix. Bold and bougie.
- Less food dye option: Use gel coloring for intensity with less volume, or embrace a mahogany hue with an extra teaspoon cocoa and a pinch of beet powder, IMO a classy look.
Can I double the recipe?
Yes.
Bake in a 9×13-inch pan and extend bake time to about 30–38 minutes. Start checking at 28 minutes. Look for set edges and a slightly soft center with moist crumbs on the tester.
Do I have to use espresso powder?
No, but it boosts cocoa flavor without turning the brownies “coffee-flavored.” If you skip it, the brownies will still be great—just a touch less complex.
Can I use oil instead of butter?
You can swap half the butter for neutral oil for extra moisture, but keep some butter for flavor.
Try 1/4 cup butter + 1/4 cup oil. Texture stays fudgy, taste stays rich.
Why add vinegar to brownies?
In red velvet recipes, a mild acid sharpens the color, balances sweetness, and gives a subtle lift with the eggs. It won’t make your brownies taste sour—promise.
How do I get clean slices?
Chill the pan 30–60 minutes, then use a hot knife (run under hot water, wipe dry) and clean the blade between cuts.
It’s a tiny bit extra—like these brownies.
Can I make them ahead?
Absolutely. Bake the day before, chill overnight, and slice before serving. The flavor actually deepens by day two—FYI, they might be “too good” then.
Wrapping Up
These Red Velvet Swirl Brownies deliver everything: bold looks, big flavor, and a texture that sticks the landing.
They’re easy enough for a weeknight win and impressive enough for your fanciest dessert board. Keep the swirl confident, don’t overbake, and let them rest before slicing. Then prepare for the compliments—because yes, you did that.