Raspberry Cheesecake Bars Recipe: Irresistible Crunch to Creamy Wow
We’re diving into a dessert moment that never misses: Raspberry Cheesecake Bars. They’re bright, creamy, tangy, and totally handheld. One bite and you’ll wonder why you ever bothered with crusts that crumble at the worst possible moment. Let’s bake something blissful, friend.
The Allure of Raspberry Cheesecake Bars
Raspberry and cheesecake? It’s a match made in pantry heaven. The tart berries wake up the richness of the cream cheese, and the crust adds a cozy crunch. Want something that travels well to a potluck or looks fancy on a cookie tray? Bars are your best friend here.
Ingredient Rundown: What You’ll Actually Need
– Crust: graham crackers or digestive biscuits, melted butter, a pinch of salt.
– Cheesecake layer: cream cheese, sugar, vanilla, a splash of lemon juice, eggs or a no-egg alternative.
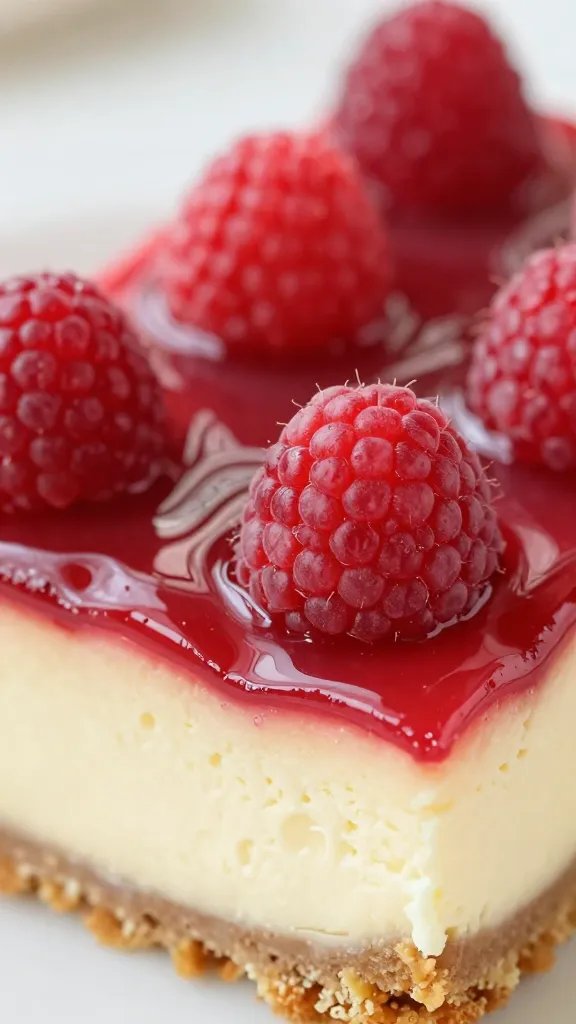
– Raspberry swirl: fresh or frozen raspberries, a bit of sugar, maybe cornstarch if you want thick.
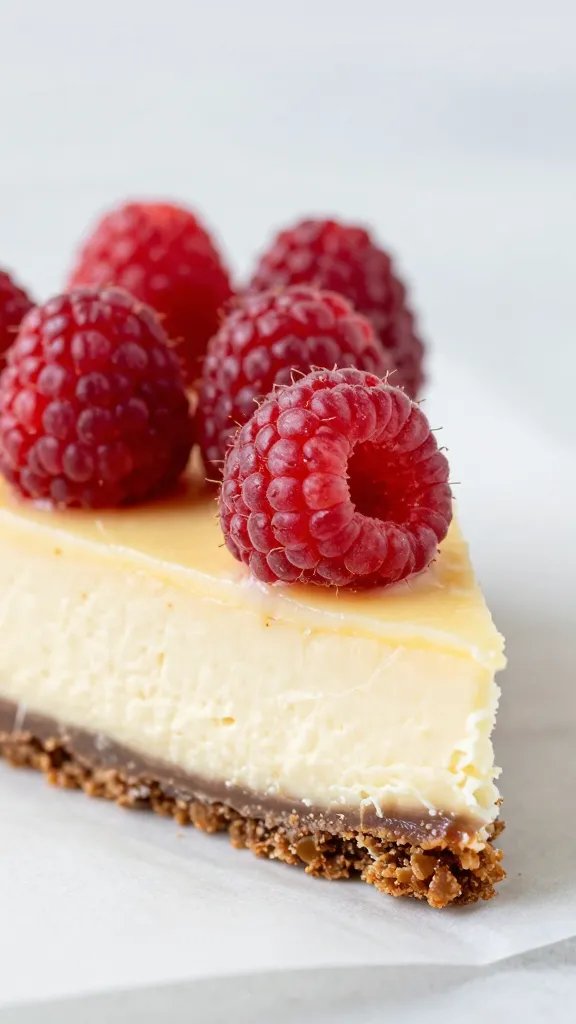
– Optional toppings: white chocolate drizzle, extra berries, lemon zest.
FYI, you don’t need a fancy grocery run for this. Most of it sits in the pantry, waiting for a good bake and maybe a smug grin.
Step-by-Step: From Crumb to Creamy Cloud
- Prep and preheat: Set your oven to 350°F (175°C). Line a square pan with parchment—yes, really, parchment is your friend here.
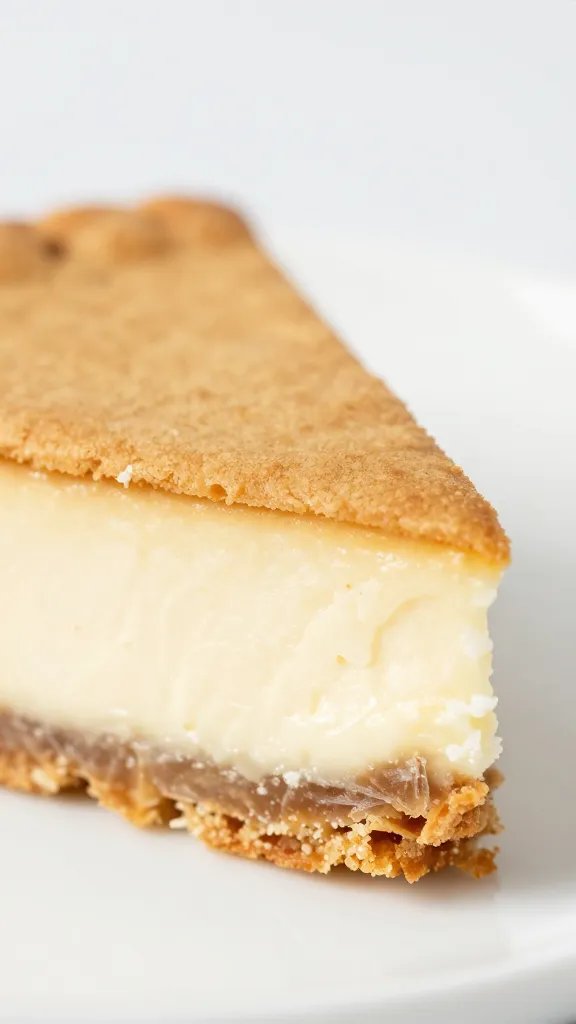
- Crust time: Pulse the crackers with melted butter and a pinch of salt until it looks like wet sand. Press it firmly into the pan. You want the crust to be compact but not dense like a brick.
- Batter up: Beat the cream cheese with sugar until smooth. Add vanilla and lemon juice for brightness. Add eggs one at a time and mix just until combined.
- Raspberry swirl: Gently heat berries with a spoon of sugar to loosen. Mash a bit for a rustic swirl, or strain for a cleaner look. Stir in a touch of cornstarch if you want extra thickness.
- Layer it: Pour the cheesecake batter over the crust, then drop spoonfuls of raspberry mixture on top. Use a skewer or knife to swirl—don’t overdo it, you want pretty marbling, not a muddy mess.
- Bake and chill: Bake until the edges set and the center has a slight jiggle. Let cool, then refrigerate for at least 2 hours (or overnight). Trust me, patience pays here.
How to Tell When They’re Done
– The edges look set, the center gives a gentle wobble, and the top isn’t glossy with raw batter.
– If you insert a knife or toothpick into the center and it comes out clean, you’re golden. If it comes out with a little layer of cheesecake, you’re fine—the chill will firm it up.
Texture Talk: What You’re biting into
These bars strike a balance between creamy and crumbly. The crust provides a sturdy bite, the cheesecake layer is silky, and the raspberry swirl adds a bright, slightly tart counterpoint. The overall texture should be sliceable, not crumbly. If yours crumbles, you either baked too long or didn’t press the crust hard enough. Don’t blame the recipe—adjust your technique next time.
Tips for a Flawless Slice
– Chill thoroughly before cutting. A fully cold slice behaves like a proper piece of cheesecake rather than a floppy mess.
– Run the knife under hot water and wipe between cuts for clean edges.
– If you want extra neat edges, run a sharp knife around the pan after it cools, then lift the whole slab out using the parchment.
Flavor Tweaks: Make It Your Own
– Swap berries: Blueberries, strawberries, or a mixed berry swirl work just as well.
– Citrus zing: Add a teaspoon of lemon or orange zest to the batter for a zingy kick.
– White chocolate love: Melt a bit of white chocolate and swirl it with the raspberry for a dessert that feels fancy.
– Crunchy top: Sprinkle a thin layer of crushed almonds or pistachios on the top before baking for texture.
– Vegan option: Use a plant-based cream cheese, aquafaba or flax eggs, and a dairy-free crust to keep it vegan-friendly.
Make-Ahead Magic: Plan Like a Pro
Bars are ideal for prepping ahead. Here’s how to do it without any stress:
– Make the crust and bake it a day ahead. Wrap well and chill.
– Prepare the cheesecake batter and raspberry sauce separately, then assemble and bake when you’re ready.
– Once chilled, these bars freeze beautifully. Slice first, freeze on a tray, then transfer to a bag. Thaw in the fridge or at room temp for a quick dessert.
Storage and Reheating Real Talk
– In the fridge: 3–4 days, tightly wrapped.
– In the freezer: Up to 2 months. Thaw overnight in the fridge for best results.
– Reheating: A quick 10–15 seconds in the microwave will soften the cheesecake a touch, but it’s not necessary.
FAQ: Raspberry Cheesecake Bars, Answered
Can I use frozen raspberries?
Yes! Frozen raspberries work fine. Thaw, drain excess liquid, and mash a bit for a nice swirl. FYI, frozen berries may bleed more, which adds to the marbled look.
Why do my bars crack on top?
Cracking usually means they baked a touch too long or the batter was overmixed. Try baking a few minutes less and cool the pan gradually in a draft-free place. If you see cracking, you can hide it with a light dusting of powdered sugar or a glossy raspberry glaze.
Can I make this without eggs?
Absolutely. Use an egg substitute like a chia or flax “egg” or a commercial egg replacer. You might need to adjust bake time slightly, but the result should still be creamy and delicious.
How sweet should the raspberry swirl be?
That’s totally up to your taste. If you’re a tart lover, keep the swirl light. If you have a sweet tooth, add a touch more sugar to the berry mixture or reduce the lemon juice to mellow brightness.
Is the crust supposed to be thick?
Not too thick. A crust that’s around a quarter to a third of an inch thick gives a nice balance between bite and bite-through. If yours is thicker, you can press a bit more firmly to compact it and prevent a crumbly end result.
Conclusion: A Smile-Worthy Slice
Raspberry Cheesecake Bars are the kind of dessert that makes you feel like a pro without the juggling act. Easy to assemble, forgiving in spots, and always impressive, they check all the boxes: creamy sweetness, bright berry pop, and a crust that holds up to the heaviest dessert pan hug. So what are you waiting for? Break out the parchment, grab a bowl, and let the swirls dance. IMO, you’re about to become the resident dessert hero of your crew. FYI, sharing is optional, but highly recommended.